Showing posts with label Photography - what what??. Show all posts

Sunday, December 19, 2010

LensHero, where have you been my whole life?

Okay, not my whole life, but at least over the last 5 years or so, LensHero.com would have been a great tool to have and I will certainly be using it from now on. Here's the gist... tell the site what camera you use, the price range you are working with and if you want, the type of photos you a looking to take. They will then give you a list of lenses that will work for you, complete with reviews and prices.

I did a quick search for a low priced (<$200), low light lens for my old Rebel and was given the 50mm, f/1.8. Now if you remember awhile back I wrote about my love for this lens, but I only bought this lens after a good amount of research. If LensHero would have been around at that time, I would have saved myself time of the computer and could have spent more time actually taking pictures!

Anyway, I will definitely be putting this site to use for my next purchase, which I hope will be a moderately priced telephoto lens! And because all posts are better with a picture, here is a recent shot with my beloved 50mm...




Monday, February 9, 2009

Photoshop Elements for Dummies like me

Inspired by the always thought provoking and informational Digital Photography School post on Processing Black and Whites, I decided to give to warm up some black and white photos myself with Photoshop Elements.  

So, if you're an Elements user, here is a quick and dirty tutorial on making warmer black and white photographs.

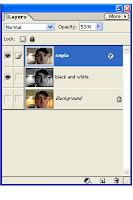
1. Start by making 2 duplicates of the Background Layer, for the sake of this tutorial, we'll call these new layers B&W and Sepia. To duplicate a layer, click on the more button in the layers tab and you'll find "Duplicate Layer".

2. Make sure the Sepia layer is at the top of your layer box and the B&W layer is just below it. Simply click and drag to change the order of your layers. Whichever layer is closest to the top will be shown first.

3. Select the Sepia layer, and then click the Layer Styles tab. Use the pulldown menu to select Photographic Effects and the select the effect "sepia". Before finishing up with Sepia layer adjust the Opacity to between 50-60%. This can be adjusted layer for the desired effect. 

4. Select the B&W layer, and from the Enhance menu select Adjust Color and then Remove Color. Now you have a black and white image. While under Enhance you may want to move the contrast to the right a bit. 

5. Now your photo should that warm feel that's not as stark as black and white but not sepia either. You can easily adjust the opacity of the sepia layer to play with this effect. 

Here is the Sepia layer:
Here is the black and white:

Here is the finished product:


And here is the same image but I left the color in the eyes by making another layer: 


Okay, now rock out the Elements! 

Monday, February 2, 2009

Foto Friday - Gone in a flash


January's Foto Friday is all about Flash. FF Co-creator, Jen, wrote a great post on the Flash Compensation settings on her Nikon.  To my slight dismay, my Canon does not have a flash compensation. 

But with the help of Photojojo, I made this handy little diffuser from an old film container. This creation is a quick, low-tech way to tame that flash!


The one and only step:
Remove an area the same width of the flash with an exacto knife.


The diffused difference:

Without the diffuser - Too stark

With Diffuser - Must softer

Photographer Beware: You may want to close your eyes just before you snap the shot. The diffuser, if not tight enough, can reflect the light back toward you a bit. Consider yourself warned!

Monday, January 12, 2009

The beauty of a 50 mm, 1.8 lens

The best 85 bucks I've spent in awhile was on my new 50mm, 1.8 lens and here is why:

The 50mm is perfect lens! 
-Great for portraits since it can reach the lower f-stops meaning higher apertures resulting in shallower depths of field.
-Great for everyday since it doesn't need as much light, meaning faster shutter speeds and less blur.
-Great for travel since it is so light and not nearly as big as most zoom lenses.
-Great for the pocket book since you can get one for uner $100.

So here it is!

The following is an example of the difference between the lens I was primarly using, a 18-55 mm (zoom), 3.5 to5.6, to the new 50 mm (prime), 1.8. 

The two pictures below were both taken with a shutter speed of 1/30 sec and the lowest f-stop the lens would allow, 5.6 for the zoom lens at 50 mm and 1.8 for the prime lens. 

This picture was taken with the zoom lens at approximately 50 mm, 5.6 f-stop, 1/30 sec.


Here is the prime lens at 50mm, 1.8 f-stop, 1/30 sec.

As you can see the ability to reach lower f-stops, which means larger aperatures, with the prime lens allows much more light in at the same shutter speed. 

*In case you were wondering the relationship between f-stops and apertures here it is straight from Complete Digital Photography by Ben Long. "F-stop values are simply the ratio of the focal length of the lens to the diameter of the opening in the aperture." 

Now that's covered, here are a few samples of the 5o mm in action. 

A portrait of Coach.
Notice the shallow depth of field, only his face is in focus.

A bokeh shot.
Notice the blurred light circles in the background.  

Musical bokeh. 
This was created using a tutorial from DIYPhotography.net.
Finally, I feel obligated to mention one more thing about the 50 mm. The auto-focus is much slower than with the 15-55 mm. If you are trying to caputure children and pets this may take some getting use to and some planning ahead on action shots. 

Okay, so that's the tale of my love affair with the 50 mm, 1.8 lens. I must get back to playing with my new toy!